 |
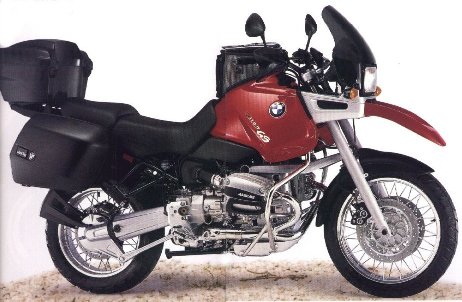
THE BMW R1100GS |
|
|
|
THE BMW R1100GS |
|
The R11GS is an expensive motorcycle however that does not stop many owners customizing theirs for individual requirements. This page explains about some of the common customizations.Other useful sources of info.
- There are many pictures of some of the parts available on the GS Optional parts page .
- Details of aftermarket suppliers are on the GS address page.
- Be sure to check out H.Marc Lewis's R1100GS registry where you can see exactly what customizations owners have done to their machines and what they think of them.
- On the owner survey page there is further information about how owners have customized their bikes.
|
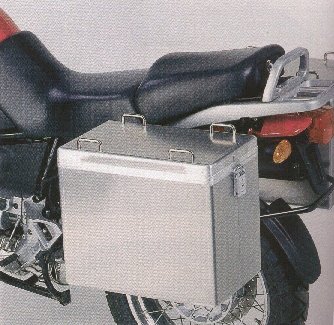
As the image on the left shows, the BMW luggage available includes:
|
|
Stock
The stock BMW saddlebags are generally good for touring although a little small. The exhaust side bag is smaller than the other (25 liters compared with 31 liters) due to a cut-out for the exhaust. (The exhaust side bag also gets hot). Owners like the looks although they are expensive. They are reasonably waterproof (unless overfilled so the lids bulge) and are surprisingly tough. Several owners have reported major spills at high speed on and offroad where the bags stayed in place thereby protecting the bike and suffering only scratching and dents).The stock saddlebags increase the width of the rear to 38.5 inches (98cm). As this is even wider than the cylinder heads (around 29 inches or 74cm) lane splitting is more difficult.
BMW offer one way to improve lane-splitting with replacement lids for the stock saddlebags. These are the lids fitted to Police R1100RT bikes, also known as City cases. They:
However, they obviously reduce capacity. Jim Patton supplied some pictures of his city cases.
- reduce the width from 38.5 inches to approximately 30 inches (76cm)
- use the same locks as the stock saddlebags but require additional emblems and reflectors
- can be ordered through any BMW dealer
BMW part number left: 46 54 2 337 019
BMW part number right: 46 54 2 337 020
For 2001 BMW now offer a wider lids that will carry a full face helmet. (They can be bought as complete units as well). They are about 6cm wider and increase capacity by approximately 6 liters.
Givi
Givi topcases are the most common alternative to the stock bags. They:However, not surprisingly a pair of Givi 50 liter bags is even wider than the BMW bags (44" or 112cm).
- are cheaper than the BMW saddlebags and topcase
- are widely available throughout Europe and the States
- are available in a range of styles and sizes (35 to 50 liters)
- all use the same plate and allow one handed operation
- all have modern styling and are waterproof
- the bigger ones take two XXL full-face helmets
- can mostly be used interchangeably as saddlebags or topcase
- options include:
- passenger backrest
- colored top
- on 35 and 46 liter topcases, a high-level brake light.
Hepco & Becker
Hepco & Becker offer several sizes of saddlebags available in tough black plastic and also two thicknesses of aluminum. They are available through sources like Hein Gericke or Wunderlich.
|
Aluminum There are also other aluminum saddlebags available which are particularly useful for offroad or extended touring use. These include Jesse, Touratech (available with or without exhaust cutout section, a version with cutout section is also available to be used with the BMW eom mounting system) and Wudo.
|
|
The Jesse bags are 32.5 inches (82cm) wide, the same width as 2 x 35 liter Touratech bags. Touratech 2 x 41 liter bags are 35.5 inches (90cm) wide.Advantages of aluminum luggage:
Disadvantages:
- Extremely strong and well engineered.
- Available in different sizes, most are no wider than the cylinder heads and less wide than the BMW panniers.
- Waterproof.
- Come with lids that are handy as trays while cooking, camping working on bike etc.
- They load through a narrow lid at the top that makes packing and unloading more difficult than with side loading.
- Mounting system is obtrusive when the bags are off.
- Expensive.
- Being aluminum the exhaust side bag gets hot. (Try sticking some special tape on the outside of the bag in the exhaust cutout section. It has insulating material on one side and thick aluminum foil on the other. Available from stores that sell motocross equipment).
Stock
The stock 35 liter black BMW topcase (as per the pre-Telelever K-series) is fine but expensive. However, it should not be overloaded as its mountings are not strong. In addition the pre-97 racks can crack unless they have been updated with the newer version.A BMW backrest (including two speakers) fits onto the stock topcase. Several aftermarket seat manufacturers (e.g. Corbin and Russell) also offer a backrest (without speakers).
Givi
As mentioned under saddlebags, Givi are the most popular alternative to stock. Available in most countries, they come in various colors and sizes e.g. 36 and 50 liters. A Givi topcase and fittings are also cheaper than the same from BMW.For use as a topcase be sure to get the Givi specific R11GS adapter plate E-184 not the universal adapter. The E-184 fits properly and allows a Givi topcase to be used with BMW bags without a problem.
To mount a Givi topcase on a R11GS
When riding without the topcase, the plate stays on and provides a larger rack than stock. However you have lost the passenger grab handle with the fittings provided. You can either get some longer bolts and then refit the grab handle and/or add an optional passenger backrest to any of the Givi topcases.
- Remove the grab handle behind the rear seat.
- Install adapter plate E-184 using the 4 fasteners provided.
As with any topcase, be careful not to overload it.
Hepco & Becker
Hepco & Becker offer several sizes of topcase available in tough black plastic and also two thicknesses of aluminum. They are available through Wunderlich.Touratech also have a 35 liter aluminum topcase to match their saddlebags.
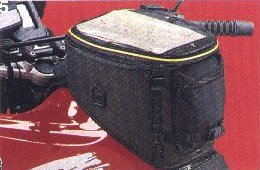
According to the owner survey, many owners like the BMW Multivario tank bag but others find it small and expensive. It has its own base plate and is expandable up to 27 liters, more than enough for one full-face helmet.It has a feature a lot of tank bag owners do not realize - when filling up you do not have to remove it.
Alternatives can be hard to fit due the size/shape of the R11GS tank. They include RKA, Roadmaster, POLO Enduro and Bagster. In addition, Touratech have a black tankbag with a 25 liter capacity that comes with two separate sidebags of 10 liters each. Cost: 279DM.
- Just pull forward on the front hook thereby unhooking it from the front of the tank (its strap is elastic).
- Flip the bag back onto the seat leaving it zipped.
- After fueling reverse the process.
BMW had two sizes of tough waterproof nylon luggage roll that can fit either on the rear rack or over the toolkit. The small one takes up to 25 liters; the large one up to 60 liters. Not sure whether this is still in the BMW catalog however similar rolls are certainly obtainable.Other soft luggage can be fitted but make sure that when fitted it does not touch the exhaust otherwise eventually it will burn through. One very practical set of soft luggage that overcomes this and has fittings for the R11GS is the Gearsack system.
Zweckdesign has a beautiful aluminum rack that sits over the toolkit cover and conveniently incorporates several holes for bungee hooks. It considerably improves security for the toolkit when riding without the passenger seat. The rack is also available through Wunderlich and comes in four colors (silver, black, red and gold).Wunderlich also have a black metal basket type cover on top of which you can fit their leather topcase.
Corbin have a large stylish top box for solo use only, the Smuggler. It fits on top of the toolkit cover and the rear rack and unlike the other topcases is not much wider than the rack. The topcase comes color coordinated and is well made but expensive at around 700 USD.
Wudo also have a small business paper sized brief case with its own bungee hooks that fits over the toolkit cover. In addition they have a black metal rack that uses the passenger seat mounting points and sits over both the toolkit cover and stock rear rack.
Wudo has a black metal rack that sits on top of the stock rear rack and makes it wider.
One of the most common customizations is the fitting of an aftermarket windshield.BMW developed the stock windshield in their wind tunnel. The result was a small but effective windshield that can be adjusted through a range of 14 degrees. Before buying an aftermarket windshield try the windshield throughout its entire range. Yes, even the fully forward position!
The air flow around the front of the bike is complicated and results in:
In extreme cases this can result in double vision at speed. Others report headaches after long rides for which two causes have been identified. First looking through the (optically imperfect) windscreen or air flow from below coming up across the tank. This air flow cab be reduced by fitting something like Aeroflow's Aeroguards or Aerostich's Tank Panniers .
- turbulence which for example shakes your head
- noise
- drag which tires you after a long ride.
You are looking to find the best compromise that suits you (and we are all different).
Sitting height
Someone on the BMW-GS list came up with:
Sitting height = height - inseam
e.g.
6 foot 3 inch - 32 inches = 43 inch sitting heightIt approximately works out how "tall" you are above the seat. This is far more useful basis of comparison than some of the manufacturers' statements like
"our tall screen is for riders over 6 foot 3 inches" .
We all have different body lengths. For example two 6 foot 3 inch tall guys can have inseams of 30 inches an 36 inches respectively. That is 6 inches difference in sitting height which can make a big difference to how they are affected by a particular screen. So in posts about windshield heights, try to state not just your height but also your inseam and even whether you use the high or low seat position.Ok, we'll start with the cheapest customization...
For some owners the stock screen does not go down low enough. However, it can be made to go back over an inch further with a simple and cheap modification.As standard the plastic knobs on the inside of the screen-adjustment screws are oval, to keep them from turning. Remove them both and grind one side of each down approximately the same amount. Here's some ascii-art of the mod:
Before (  o  )
After    (o  )
Notice that only one side has to be ground down, the other side is enough to keep the knob from turning.
You may find it useful to ride down a quiet road where you can stand on the footpegs. At some point you will rise above the noisy turbulence created by the screen. This gives you an idea of how quiet it would be if you remove the screen altogether. The downside is that it is tougher on your neck muscles.Post 1
I removed the stock fairing. For me (6'0", 32" inseam), the stock fairing creates lots of turbulence at helmet level, and this is NOISY, even with ear plugs. No fairing means smoother airflow at my helmet. I don't want to get a bigger fairing, either, because I like the wind (especially when it's hot). I'll trim my stock screen so it's just as tall as the instrument pod.Post 2
I'm 6'0" with 30" inseam and, regardless of mounting angle, the stock shield pushed wind right onto my helmet and caused lots of noise. I removed my stock shield and it was much better (95 R11GS). The unfaired bike really smoothed the airflow around my helmet, making it much quieter.Post 3
I removed my screen about a year ago and I find this solution better than stock on my 95 R11GS.However, it does make an already ugly bike even uglier, if you can believe it's possible.
With the stock shield I get the airflow at highway speeds right onto my helmet's faceshield (I'm 6'0", 32" inseam, Corbin seat mounted on high setting).
I am probably going to buy Givi and since it's a little longer than stock I anticipate it'll provide a better solution but not the ideal one. Parabellum is not an option for me since I don't care for its looks, and Aeroflow with lowers would just make my bike an R11GS/RT, which I don't want. Now, I hope a tinted Givi with tank panniers will provide better wind/weather protection.
Post 4
I modified my stock screen. Then I bought a Givi and tried that. Tried modifying the Givi. Finally gave up as it was still too noisy.I tried a set of tank panniers as it seems that a lot of the turbulence comes from below. The combination of no-screen and tank panniers gives me a very quiet ride.
Post 5
I am not very tall (5'-7"/30 inseam) so I don't need a higher shield. In fact, what I was looking for was a lower shield.Last summer, I rode with the shield removed altogether for a 5000 km trip in nice warm weather. This was great because the bike is a lot quieter without the shield and I like driving with no visual obstruction.
But when you drive at higher speeds (+110 kmh/65 mph), the wind pressure gets pretty strong (and even worse for the passenger). In wet weather, you also loose the protection of the shield.
So I thought the ideal situation would be to have an adjustable windshield that offers more play that the actual adjustment range. As the stock screen is actually quite cheap (around 110 USD) I didn't mind if something went badly wrong.
I cut the shield in half horizontally and drilled slots so that the upper part can now slide up and down almost 5 inches. This way, when the shield is down, it is just slightly higher than the instrument cluster: it's almost like having no shield at all. Then, if I want more protection, I slide it upwards and it sits about 1-1/2 inch lower than originally (which makes for almost full protection for someone my height if you adjust the angle to its most upright position).
I use screws with wingnuts so the height can be adjusted in seconds.
Plus, if you want to remove the shield altogether while traveling, you can easily store it in your luggage because it gets a lot more compact when you slide it down.
All in all, for me this was a great improvement. I get the advantages of good protection for high speeds/bad weather plus the advantages of a cooler, quieter drive in the nice summer days. Riding with no shield feels more like the good old basic driving fun.
Directions
Cut the windshield horizontally, 8 inches (20 cm) from the top. Let's call the top part Part A and the bottom part Part B.To cut the plexiglass, I simply used a metal saw with fine teeth. To keep a straight line, mark the plexi deeply with a screwdriver or utility knife. All cuts in plexi should be rounded slightly and sanded smooth, not only for aesthetics but because it makes the material less prone to cracking.
After cutting, reinstall Part B on the bike and try to make Part A slide down. As you see, there is a problemm because of the "wings" of Part A. Indeed, you have to make a vertical cut at the bottom of each side of Part A to cut those wings and allow Part A to slide down smoothly into part B.
Now, Part B can travel up and down on more than 6 inches (15 cm).
We now have to create a system to fix Part A and B together. To do this, take your time and go step by step. First, position Part A in its UP position inside of Part B. I left an overlap of about 1-1/2 inch (4 cm) between the two parts. Hold the parts in place (use vise grips with cloth in the claws) and drill 2 holes through both parts at the same time. The holes should be about 3/4 inch from the top of Part B and 3/4 inch from the bottom of Part A. Sideways, they should be about 5-1/2 inches (14 cm) apart.
Then, position Part A in its DOWN position. Drill again using the same procedure. The vertical distance between the holes should be 2-1/4 to 2-1/2 inch. The holes should be about 1/4 inch (0,6 cm) in diameter, and the screws a bit smaller.
Now that you have yous UP and DOWN positions secured, all you have to do is to connect the holes so that the parts can slide. This is the part that takes some patience. To dig the groove between the holes, I made numerous holes in between and then hand filed the groove until smooth if I remember. I guess a Dremmel or small jigsaw would have made the job faster and easier... Then put screws with wing nuts to the outside and try your adjustable windshield !
Ok, we are almost done. You might wonder if Part A will be able to resist the wind in its UP position since the overlap is only 1-1/2 inch. I was worried, too, so I took no chances. What I did is add 2 extra holes on the lateral section of the shield and use wing nuts there too. These holes give a lot of extra stegnth - they are used only when the shield is its uppermost position.
Sounds a bit complicated on paper. But it's fairly easy for anybody with some experience with tools. All you have to buy is 4 screws and 4 wingnuts and check if you have nice blades for your saw. The work itself can easily be done in one afternoon, taking your time and checking after each step to make sure you are on the right way.
This gives an edge which is frequently better than stock.Quicker alternative
- Choose a suitable saw for example:
a) a bandsaw with a fine tooth blade
b) the finest tooth blade hand saw e.g. 6" blade Stanley
c) a coping saw.
Avoid sabre saws.
- Find a warm place to do the cutting eg in direct sunlight. Keeping the plastic warm tends to reduce the likelihood of cracks.
- Cut slowly and carefully. Avoid back and forth motion which tends to start cracks.
- To smooth the edge, use woodworker's files, first medium course then fine. and/or two grades of sandpaper on a sanding block.
- Finally use some steel wool.
- Use a Dremel tool with their all material cutting wheel to cut. It melts the edge while it cuts so avoids cracking.
- Use the grinding wheels or sandpaper on a block.
- Finish with a polishing wheel.
Givi
- Not that much bigger than the stock windshield.
- Adjustable in the same way as stock (i.e. through 14 degrees).
- Better than stock for drag but no quieter.
- Relatively cheap and was the most popular replacement in the owner survey.
- Available in most markets.
Ermax
- Not that much bigger than the stock windshield.
- Better than stock for drag but no quieter.
- Adjustable in the same way as stock (i.e. through 14 degrees).
- Relatively cheap.
- Full or half tint options.
- Available through European aftermarket suppliers. Made in France and available at Wunderlich.
Wudo

|
|
|
MPS
Available from:
- Made in two sizes:
- Standard.
- Slightly bigger than the Ermax and Givi windshields.
- Both are available in clear, tint or in a wide range of colors:
- Solid (i.e. non-transparent) black.
- Transparent red.
- Transparent blue.
- Transparent violet.
- Transparent yellow.
- Transparent orange.
- Transparent metallic red.
- Transparent metallic blue.
- Transparent silver.
- Transparent gold.
- Transparent fluoresent green.
- Transparent flourescent pink!
- Similar price to Ermax and Givi (around 70 pounds sterling).
MPS
Daneheath Business Park
Heathfield
Newton Abbot
TQ12 6TL
England
Tel: +44 1392 455065 (24 hour operator)
Fax: +44 1626 836666
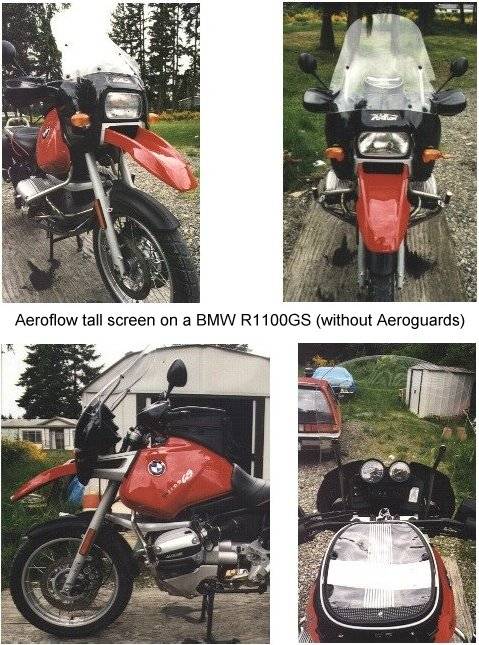
Aeroflow
As regards size of screen the rules seem to be:
- Much bigger than the stock windshield.
- Available in:
- Standard or tall screens.
- Custom sizes (cutdowns of the standard and tall screens).
- Aeroguards (or lowers that fit on tank and reduce drag especially on legs).
- Smoke or clear body (no extra cost).
- With Aeroguards provides best coverage of this group. Many owners report that protection is similar to the R1100RT.
- Well made.
- Riding without Aeroguards at speed can cause excessive turbulence.
- Interferes with standard BMW handguards.
- Ugly - check out these images.
- Expensive.
- Brackets can be welded to its mountings e.g. to hold a radar detector or aux lights etc.
- Is brittle and shatters if hit by blunt objects.
- Available from Aeroflow .
- The best fit is just being able to see over the screen.
- If your sitting height is above 40" you should be able to see over the tall screen.
- Between 37-40" you could try a tall screen then cut off a bit if necessary. (Aeroflow offer a custom service for both screens).
- Below 37" you probably need a standard screen.
Parabellum
Parabellum screens tend to be thinner than the other aftermarket screens. This makes them both lighter but also more fragile. Some owners have reported problems with cracks appearing around fixing holes. Several have even reported fractures. Two suggestions
- Much bigger than the stock windshield.
- Available in standard or tall.
- Ugly.
- Flexes at speed.
- Interferes with standard BMW handguards
- Expensive.
- Available from Parabellum .
- Never overtighten the fittings.
- Use additional foam or rubber between the fitting and the screen.
To fine tune the turbulence/drag/noise at various speed try:
- changing your riding position e.g. higher/lower seat, re-position handlebars
- adjusting the shape/size/position of the screen
- Saeng edging.
BMW Handguards
The Aeroflow and Parabellum windshields interfere with the BMW handguards on about the last inch or so of lock on both sides. However, there is some give so you can almost get to full lock. If it is a problem you can:
- Rotate the handlebars back (which also reduces the lean forward). (Not too far, else the left handgrip control mount hits the tank on full lock).
- Adjust the controls to suit again.
- If still a problem, make smooth (i.e. curved) cutouts on the Aeroflow where the handguards still contact.
One of the things that is often praised in the Press is the R11GS's seat. For short periods it is fine, wide and supportive. But some owners find that when living with it for a while the comfort fades after an hour or two.The best advice is try:
- Living with the stock seat
- A simple fix
- Customized seats
Some owners do get on with the stock seat (or learn to put up with it) as these posts explain...Post 1
"It's a shame that people don't spend at least 6 months and/or several thousand miles on the stock seat to find out how well it actually works.""A friend has over 100,000 miles on his 95 R11GS and still uses his stock seat. (A couple of his rides were coast to coast in under 40 hours. That's around 2,400 miles at a time)."
"My own GS is 4 months old and done around 6,000 miles. I did 1,484 miles on the stock seat last weekend without any problem. The stock seat is now extremely comfortable for me (although it certainly was not even a month ago)."
Post 2
"Awhile back someone wrote that the seat breaks-in after several thousand miles. At that point I'd done about 2500 miles and I was sceptical. It began to break in towards the end of a 2500 mile tour (or perhaps it was my butt!).""By 6,000 miles, however, I noticed a substantial improvement. The convex rounded back of the seat now seems to have more give and my butt can settle in. More comfort, less sliding. I'll stick with the stock seat too."
However, these owners do not speak for all and many find the stock seat is uncomfortable. But if you try yours out first you'll find out if it's ok for you. If you find it uncomfortable try working out what hurts e.g. underside of thighs. It makes doing something about it easier.
If, after trying the stock seat out you find you can't live with it, the next thing to try is this simple cheap fix.For some owners the main problem is that the seat slopes forward. To overcome this try fitting some washers under the front mountings with longer screws. This flattens the contact area and for some this turns the seat into something they are happy to live with.
The spacing required is entirely up to you. Experiment and find what best suits you - spacers from 1/8 - 5/8 inches (3 - 16mm) have been suggested. (Put spacers under all the mountings if you want to try increasing seat height).
The disadvantage of this is that it opens up a gap between the seat and the rubber strip at the back of the tank - try filling it with black weatherstripping.
Some owners are happy with inflatable air cushions with or without sheepskin covers. For example Therm-A-Rest seat cushion size, 12 inches wide by 17 inches long and is typically available from sporting goods stores. This is cheap but takes some getting used to, especially getting on and off.
The more time you spend experimenting, the better you will understand your problems with the seat. This makes fixing it easier.
If you have tried the stock seat and the simple fix, by now you'll know what your problems are with the seat! For most owners they are:Sorting these problems out means customizing a seat.
- seat slopes forward so you tend to slide forwards and end up pushing yourself back
- area you sit on is convex so you sit ON it not IN it
- seat has "shoulders" towards the front which rub on the bottom of your thighs. (The taller the rider or the further back you sit from the tank, the worse this is).
The easiest solution is to find a local company that recovers motorcycle seats. Most are able to customize the seat if you tell them what your problems are. Take your seat along or get a spare from a motorcycle breaker.
Other than that there are a three Californian companies that specialize in customizing seats particularly, but not exclusively, BMW.
a) Corbin
|
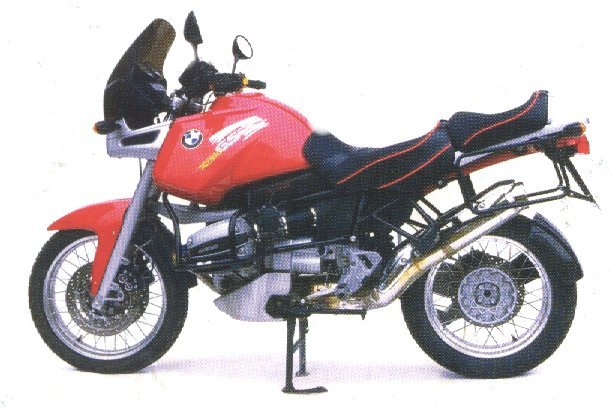
Probably the biggest and best known, Corbin produce a replacement seat for the
R11GS with a large flat area or bowl. The image on the left shows an R11GS with
accessories from Wunderlich including Corbin seats in black with red piping.
Click on it to see the bigger picture.
|
|
- Advantages:
- comfortable for most owners
- lots of outlets including outside US e.g. Wunderlich
- lots of options e.g. leather, piping, backrest etc
- has a one-day "ride in" service for individual customization
- you keep the original seat they sell you another.
- Disadvantages:
- some owners complain about fit
- some owners complain about service
- increased width reduces reach to ground
- passenger seat backrest not useable with BMW topcase
- usually most expensive of the three companies here.
b) Russell
Customize your seat using butterfly springs under "wings" which stretch further out on both sides. Require photos of you on your bike. Contact to agree date for work and carrier required.
- Advantages:
- comfortable for most owners
- lots of options e.g. leather, quilting, raincovers etc
- has a one-day "ride in" service for individual customization
- usually cheaper than equivalent Corbin.
- Disadvantages:
- you have to send your original seat to be recovered
- looks (they refer to them as "butt ugly" themselves).
c) Travelcade
Adventure traveler Helge Pedersen ( "10 years on two wheels") gives a review of his Travelcade Gel seat.
"A heated seat that actually gets HOT " says Marco Prozzo.
d) Ergo
Wunderlich now offer sculpted alternatives to stock including:All are available either as exchange or replacement.
- rider (original thickness)
- rider (lower than stock)
- passenger (original thickness)
e) Sargent
"Sargent redid my 96GS seats with an "atomic" foam upgrade, which is listed on their website as for the R1100RT only, new vinyl Grip Tex (you can get smooth or "diamond plate" texture), for $334 + UPS...for both seats. A nice company to deal with, and their quality is much better, as are their prices, than the Corbin I ordered for my sport bike which neither was finished properly, nor fit my bike, and cost over $500. I like the look of the Sargent. It uses your seat pans, which you send to them, then they sculpt the seat area to accept their special foam, and recover all. They will further customize any reat and have a good website." www.sargentcycle.comf) Mayer
The original founder of Day Long saddles, Bill Mayer sold to Russell. Later he decided to make seats again using another design under his name. They were very high quality products worthy of his title, Saddlemeister. Unfortunately production stopped when Bill died.
For onroad touring the third best way to improve your comfort range (after seat and screen) is to replace the stock pegs with wider and preferably sprung items. (More like the stock passenger pegs). Other BMW pegs use the same mounting points so are easy to interchange.Notes
BMW pegs
- Usually accessing the brake lever and gear shifter is still ok but try to test this out beforehand as everyone is different.
- Installation of the springs can be tricky.
- If the footpeg is lowered, ground clearance is reduced.
Many BMW pegs fit directly or can be made to fit with slight adjustment or by fitting simple spacers/brackets. For example:Available quite cheaply from BMW dealers.
- R100GS - drops the footpegs down around an inch and slightly forward. Two types:
- Offroad type - similar to stock R11GS with serrated top and rubber insert
2x Rubber outer 46 71 1 242 109
1x Footpeg 46 71 1 242 017
1x Footpeg 46 71 1 242 018
- Onroad touring type - larger flatter rubber covered footrests
2x Rubber outer 46 71 1 454 887
2x Flat washer 46 71 1 454 388
1x Footpeg 46 71 1 454 535
1x Footpeg 46 71 1 454 536
- K 1985 - cheap alternative for onroad riding. The tip must be ground down to make the peg level.
Non BMW pegs
Repositioning the footrests
The WüDo lower pegs for the R11GS use the stock rubbers but are more expensive than alternative BMW ones.
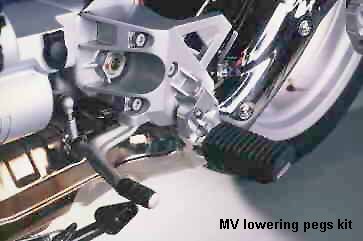
Marco Prozzo says "Absolutely great. Notice a difference right away. Used to have to stretch my legs much more frequently than now. Moves the foot position down and forward approximately 1 inch in both directions. Big foot beware as this reduces the space between peg and shifter.... At first glance you cannot distinguish them from stock pegs. The strong springs detered me from doing this installation. My dealer took 20 minutes to do it."
The MV lowering pegs kit for the R11GS.
Verholen have good quality but expensive mountings that lower the footpegs approximately 2 inches. They can be used in addition to any of the non-stock footpegs to further lower the footpegs.Obviously lowering the footpegs reduces ground clearance.
Wunderlich have a kit that lowers the stock passenger footpegs (40mm lower, 10mm forward).
The stock tank has no knee pads. Some owners find they wear the paint away with their knees.
The knee pads from the K1100LT fit perfectly on the R11GS tank although some find them a bit thick.
Alternatives are available from Wudo .
The electrical system of the R11GS is robust and has a generous output (700W), unlike previous GS models. This means additional electrical accessories can be added without much worry of overloading the system/flattening the battery.
The R11GS comes with the same electrical socket for accessories e.g. heated jackets, that is used on the K-series. Note that this circuit is:The plug is available from BMW dealers and several other sources. One is John Deere series 50 farm tractor accessories, the:
- not switched off with the ignition so is ideal for battery charging
- fused but the indicators are on the same circuit!
If you want to attach an additional socket for light loads that is controlled by the ignition, use the parking light lead in the headlight assembly and fuse it separately.
- male plug is John Deere part no RE11344, around 8USD
- female socket is John Deere part no AL25073, around 4USD.
The stock headlight has a single 55/60W H4 bulb. This can be replaced very easily with larger wattages e.g. 55/80, 90/130.For bulbs of more than 80W electrical power fit a relay, usually under the tank. (Sure you can fit the bulb and it will work but after some time your headlight switch will burn out and need replacing).
There are several replacement bulbs that take the same 55/60W electrical power and claim to offer increased light output. These bulbs do not require a relay and are commonly available from auto accessory stores but they are more expensive than stock and tend to have a shorter life. However, many listers now dispute manufactuers claims of increased light output. Examples include:
- Philips Premium H4 55/60W bulb
(light output approximately equivalent to conventional 80/85W halogen bulb).- Stanley Raybrig H4 55/60W "Super Beam Halogen Bulb"
(light output approximately equivalent to conventional 125/130W halogen bulb).
Michael Roeder has documented how he added auxiliary lights to his R1100GS with photos, a wiring diagram and instructions. Check out http://www.infernosoft.com/timberwoof/motorcycle/headlights/
The stock horn is a single thin unit that can hardly be heard at realistic speeds. Previous BMWs had twin Fiamm type horns. Similar horns are available quite cheaply from most auto accessory stores and are quite easy to fit.A single Fiamm horn can be fitted as a direct replacement (although the bracket provided may have to be twisted). Simply:
Twin Fiamm horns can be fitted almost as easily.
- Disconnect the stock horn wiring.
- Undo the single nut that holds the stock horn to the bike.
- Remove the single nut that holds the stock horn to the bracket.
- Work out which bracket is best for the replacement horn (stock or one that comes with the replacement horn).
- Fit the bracket to the horn, then horn to bike and reconnect.
- Ensure the horns/brackets/wiring is positioned in such a way that it does not interfere with anything else. Check by turning the steering from lock to lock.
Note that a relay is not required since the horn circuit already has one as standard.
Owners whose main interest is touring might find the following posts useful.
Any bike takes time and effort to get right. Here's what my 11GS took:
- New seat (mine's Corbin but not basket weave, gets to you when it's hot).
- Larger windshield (mine's Parabellum).
- When you've got these two you start getting shoulder and neck cramps cause your butt's in a pocket and there's no air to hold up your torso. Rotating the handlebars and/or backbars are required to make you comfortable again.
- Now the air comes up your knees and torso, under your helmet and tickles your nose. To stop that try Tank panniers by Aerostich. Also gives you a place to stash stuff.
- Throttle rest for relaxed cruising eg Throttlemiester.
I fitted an Aeroflow windscreen and a Corbin seat then rotated the handlebars back to reduce the lean forward. Just be careful that the handlebar controls don't touch the tank at full lock.
Stock 95 R11GSA. My tailbone ached at the 100 mile mark. One 700 mile day had me wondering about my sanity!First, a Corbin. Went on a 600 mile run to check it out. WoW. Pain gone and the seat got better with more miles.
Next, I was taking a beating from wind trying to pull my helmet off my head. Cured that with a Parabellum with the short shield. However I didn't like the way the highway lines changed when looking from thru to over the shield. So cut it down about 1.5 inches and all was ok.
Now, the handguards hit the shield. Dremble tool, files and sandpaper fixed that allowing full lock.
Without the wind I got neck and shoulders cramps from the forward lean. Bar backs fixed that problem (and increased clearance between the windshield and hand protectors). The bars hit the tank bag on full lock but I can live with that.
The wind curling up from under the shield was being rerouted by the tank shape and coming up over my knees, up my chest, under my hat and tickling my nose. So, I bought Aeroflow lowers. The mounting sucked. Tried all different velcros and they did okay but if you happen to tap down on the guard, the whole thing pops off. I was thinking about making some metal brackets when I lost one on a gravel road. I removed its twin. But they did take care of the air flow problem.
Finally Aerostich tank panniers. Took care of the air flow problems (and improved storage on my trips).
Now I have a comfortable bike (for me) that I can ride hard for a long time without getting too tired.
Some owners find that the standard BMW suspension units (made by Showa) have a short life and that the performance drops off significantly after say 15 minutes riding twisties. Also the units offer only basic adjustment and are "non-rebuildable".
Among owners who change their shock absorbers, another common comment is that the standard springs are too soft so fitting harder ones helps
Aftermarket replacements include:Ohlins
Possibly the best, certainly one of the most expensive on this list (around 1800USD with fitting). Improves ride quality and grip significantly. They offer longer life than the standard units and are rebuildable. The Ohlins model for the R11GS has all the same adjustments as the standard units plus 25 click rebound adjustment front and rear, as well as retaining the rear remote preload adjustment knob. They are available through Touratech and Wunderlich.White Power
The front damper is a "Bleed Adjuster" with integral nitrogen-charged oil reservoir, compression and rebound damping adjustment, and spring preload.The rear "Super Adjuster" model has a remote nitrogen-charged oil reservoir, compression and rebound adjustments, and available remote spring preload adjuster.
Retail prices (May 98) are front $525.11, rear $740.57 which probably includes the remote spring adjuster, but I'm not certain. There may be a lead time for orders, since these are low-production items. Dampers are rebuildable and are distributed in the U.S. by White Brothers (no relation) in California, and sold through dealers. Also available in Europe through Wudo.
Technoflex
Another manufacturer of expensive but high quality suspension units. Several models are available to fit the R11GS. All are serviceable and rebuildable. Available through Wudo.Penske
Have their own website and offer a custom service. Prices start around 700 USD.Fournales
Fournales are French-made air suspension units that cannot bottom out. They:However, they are not currently imported into the US and if they fail they leave you without any suspension.
- offer good performance and should last longer than standard
- are deceptively simple looking and are half the weight of the standard shock
- have no spring but a unique, very-high-pressure, air-spring system which delivers true rising-rate suspension with little or no inertia
- have no damping adjustment (none needed). Dead simple.
- are serviceable by dealers only
Post 1 Lowering the seat height
I am 5'7" on a good day and weigh 150 pounds so I had to lower seat height.Get a local seat upholsterer to cut down the seat and narrow the front. Consider fitting backbars if the handlebars are too far away.
I put a Paralever torque rod from an R1100RS on my '95 R1100GS and my seat height went down by well over an inch. I also set the preload on my front shock to its lowest setting to level the bike. I'm gonna try an RS centerstand to compensate for the lowered suspension.
Apparently some owners put the shorter RT stock shocks on the GS. This reduces ride height but also suspension travel. If you do this, check the spring rates (the RT is 20+kg heavier than the GS).
Post 2 Lowering the ride height
"At 5'5" I could barely keep my GS upright unless it was moving. I had my Corbin seat cut to lower me but that just made for an uncomfortable ride. After dropping my bike "one too many" times, and not wanting to replace the entire bike with one which would "fit me," I successfully lowered my GS with Ohlins shocks".(Most aftermarket shocks can be used to reduce ride height. Usually you have to buy both front and rear. However, check before purchase with the dealer/manufacturer that your individual requirements can be accommodated).
"The Ohlins have an adjustable stop which was set to achieve a 2" reduction in height. Additionally, I took 2" off the center stand, but only 1.5" off the side stand, which was too short already (so the bikes sits up higher now)".
"In retrospect, I should have had the GS lowered 1-1.5 inches, because the shocks have now settled some. (I have 40,000 miles on the bike, about 30,000 on the shocks)".
"After getting the Ohlins, I went back to Corbin and had the seat "re-padded" some, and could probably use a little more, again because of how much the bike has "settled" over time".
"Getting the Ohlins w/ installation cost me about $1800. I can hear gasps, but I look at it this way: Selling the GS and buying a new bike (if I could find one that I liked as well) would have cost me MUCH more than $1800. I already had my GS custom painted, had the Corbin, had accessories, etc. For me getting a new bike is just part of the costs, as I like to outfit it to my preferences and tastes. I have never once regretted spending the extra $ to set up a bike I love so that it is safe, comfortable and easier for me to handle".
Riders with big feet
My dealer relocated the hose from my rear brake reservoir so that it is now INSIDE the frame member in that region. Now when I slide my size 14s back so that I can rest the ball of my foot on the pegs, I don't "snag" the brake hose with my heel.It's something that other "bigfoots" out there might want to consider.
K & N air filters are commonly available and give a small power gain as they are less restrictive than the stock filter. There is a K & N filter that fits the R11GS (and it also fits the R11RS).Note these filters are generally fine for onroad use. However as they are less restrictive than the stock filter, they are not a good idea in dusty conditions e.g. offroad. In dusty conditions the small performance gain is probably not worth the likelihood of increased engine wear.
Touratech offer replacements for the two chrome plates that fit on the end of the standard exhaust. They are carbon fiber, save 0.6kg in weight, and cost 249DM.Gissel and Schneider
The German company Gissel and Schneider make exhaust modifications to the stock R11GS exhaust. The modification can't be seen by looking at the exhaust and does not change the engine characteristics. The bike no longer sounds like a washing machine but like a slightly louder version of the old boxers. They provide a wav sound file on their web page. It costs about 280 USD (420DM).BMP (Baxter Metal Products)
have a low pipe system for the R11GS that is very well made (all stainless except for an aluminum wrap on the canister). This means you can fit the stock exhaust-side saddlebag from other oilheads e.g. R1100RT which is larger.The pipe is lighter than stock and has a mellow sound that is not objectionable to most people. It is around 600USD. Marco Prozzo has a pic of one on his R11GS page.
Available through Bob's BMW or
Baxter Metal Products
6341 Ridgeway Dr. #A
Pollock Pines
CA 95726
U.S.A.
Ph.# 1-530-647-0103 or 1-530-677-2109D+D
make two kinds of muffler, one a "straight- through" pipe that is supposed to be REALLY LOUD, and one made for European use that is much quieter. This has a Ducati-like attitude when on the throttle, yet at idle it's quiet enough to sneak around without upsetting people.The D+D is much lighter than stock and uses the O2 sensor. It is also low enough that a larger size saddlebag can be fitted.
Gianelli
have two racing versions of their neat looking GIANT4 exhaust end can that fit the R11GS.Check out the English version of their website www.giannelli.it or contact them at Giannelli Silencers S.R.L.
- Racing Acciaio in stainless steel
- Racing Carbonio in carbon fiber
Via Gonzaga 12/14
06017 Selci (PG)
Italy
Email: gianne23@interbusiness.itLaser
Laser exhausts are made by a dutch company "Jama". The exhaust consists of one can only (instead of the 2 pot stock system) so saves weight and apparently sounds better than stock.Jama also sells a chip that changes the mapping of the EPI. Together with the exhaust system, Laser claims a 10% gain in performance.
Remus
have two models for the R11GS, the Grand Prix and Viper. Both come in polished aluminum with street legal and racing versions. They also make catalyst versions. Remus exhausts are available from Wunderlich.Staintune
are an established exhaust manufacturer from Australia with a reputation for quality exhausts that are not cheap. The Staintune for the R11GS and R850GS costs over 1100USD.Staintune exhausts are available from BMWCAL. They also list Staintune dealers in the US .
Sebring
exhausts are available from Touratech and Wunderlich. This is a polished stainless steel system that saves about 3kg over the standard item and Sebring claims it sounds better. A catalyst version is an option.Two Brothers
have high and low exhausts for the R11GS. The pipes look great, are light, and show a positive power addition above 3500rpm for both torque and HP on the manufacturer's own dyno graphs (not verified).
Wunderlich sells an exchange replacement chip. They claim it gives 5 to 6 extra bhp between 3000 and 6000 rpm. Cost: 548 DM.
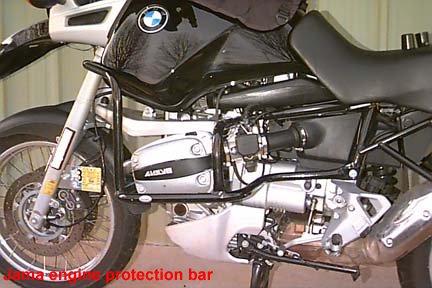
The BMW model shown (part no. 146 71 2 317 043) does not attach to the weak area around the gearbox. However it must be removed to change the oil and filter!
(The BMW hand-guards (part no. 71 60 2 340 208) are also shown).Hepco & Becker (available from Wunderlich) have two parts for the R11GS:
the engine protection bar (chrome at 259 DM or black at 228 DM)
and the tank/front light protection bar (chrome at 229 DM or black at 219 DM).
They also have similar parts for the R 850/1100 R (chrome or black) and R1100RT (chrome only).The Jama R11GS model (made in Holland) is available in black. For more nice pics check out Marco Prozzo's R11GS page.
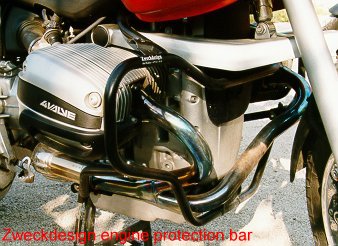
The Zweckdesign bars for the R11GS are available in 4 colors (silver, black, red or gold). They do not attach to the weak area near the gearbox but unlike the BMW ones, don't need to be removed to change the oil and filter.
A tank/front light protection bar is also available in the same 4 colors.
Stock
The handguards available from BMW are:However, they do not offer real protection for offroad riding.
- quite cheap
- black plastic
- wide
- attached to the bike at one end only (inboard)
- fine for touring use as they protect the hands well from the wind
- ok for occasional offroading.
Touratech
Touratech supply shaped Acerbis Rally handguards with the correct fittings to bolt straight on to an R11GS. These offer full offroad protection and are neat but expensive.Acerbis
The original Acerbis Rally Guards are available in a number of colors from most offroad suppliers. They are more expensive than the BMW handguards but offer more protection from object strikes as they are attached at both ends and have metal reinforcement. They are substantially cheaper than the Touratech ones. However some work is required to get them to fit the R11GS.To make Acerbis Rally handguards fit a R11GS
H. Marc Lewis has pictures of his '95 R11GS fitted with modified Acerbis Rally handguards.
- Left side - use a longer bolt through the bar-end weight.
- Right side - trim the plastic to allow the removal of the brake reservoir lid.
- Both sides - start by mounting the inner attachment point first.
There is an extension for the R1100RS front mudguard. It is not an exact fit but it can be mounted on the R11GS lower front mudguard without much difficulty. This keeps the front of the engine (above the bash plate) much cleaner.As an alternative, cut a perspex sheet to fit over the same part of the engine. Drill appropriate holes in it and mount using the stock bolt holes fitted with longer bolts and appropriate spacers. Being perspex it's not obviously seen.
Wudo has black rubber flaps that fit the R11GS to keep your feet warm. Compared to older boxers the cylinders are positioned higher (for improved ground clearance) so your feet do not benefit from the warm air coming off the cylinders. Nice in cold rain.
The R11GS "frame" can break when used very extensively and heavily off-road. (The gearbox mountings fail around the footpeg brackets). However, only a tiny number of failures have occurred, mostly in Australia. For more information, see David Loone's R11GS page .BMW has an Adventure kit that they supply to owners in Australia (also available under request in Canada) or those who break their frames.
Touratech also sells two "reinforcing" Yellow Line Hard-Parts for the R11GS.
- It consists of a new steel bracket on both sides located between the footpeg plate and the gearbox casting. They are "C" shaped to curve around the swingarm bolt and are bolted through the 3 footpeg plate mounts and the subframe bolt. Both brackets are black.
- On the left, a new footpeg plate is used to allow enough space for the bracket and the bracket itself is shaped at the top so that it bolts to the outside surface of the subframe mount. Their are spacers inside the subframe where the bolt head used to be and the bolt head is now on the outside of the bracket.
- On the right, the original footpeg plate is retained. The bracket is much like the one on the left but is shaped at the top so that the bracket bears against the rear of the subframe mount. Spacers once again fill the original mounting bolt hole and the head of the bolt is now bearing onto the bracket so the head of the bolt is exposed where it used to be hidden inside the subframe mount.
- The Adventure Kit is composed of the following parts.
Parts Numbers 1 Right side reinforcement plate
1 Left side reinforcement plate
1 Large cast piece for left side
2 Round spacers up to 10/95
after 10/95
1 Pkge w/2 bolts (M8X45)
1 Pkge w/ 1 bolt (M8X60)
1 Pkge w 2 bolts (zylinderflan)46 51 2 325 860
46 51 2 325 946
46 51 2 325 911
46 51 2 351 640
46 51 2 325 938
07 11 9 901 033
07 11 9 920 152
07 11 9 900 018
- Gearbox mountings
Consists of a yellow plate between the cast foot peg mounts and the transmission that provides a second support point for the left and right sub frame mounting bolts. Simple to install and looks very trick.
- Steering stop (a version for the 1150GS is available)
This yellow plate mounts on the front steering triangle and is often misrepresented as a front frame brace. It is not, it is purely a steering stop, to avoid snapping off the fairly weak cast steering stops on the upper triple clamp. Again simple to install.If you ride a lot offroad the steering stop is probably more important than the gearbox mountings. In a fall, it stops damage to the triple clamp and brake reservoir.
Wunderlich have a neat but expensive radiator blind. It is manually controlled by a cable operated handle that fits on the handlebar.
Wunderlich offer two different wider foots, one for pre 98 models and the other for post 98 R11GSs. (In 1998 the stock side stand was redesigned). Both bolt to the original stand.Schneider do a larger foot, the fatfoot, for the R11GS that bolts on.
However some owners have reported that these bolted on items fall off (even when glued on). An alternative is to cut a flat piece of iron to shape, weld it on to sidestand and paint it black.
Stainless brake lines improve the feel of the brakes not overall braking performance. Be aware that the brake fluid should be changed regularly (annually recommended). When the fluid needs changing the brakes feel spongy. Fitting stainless brakes lines improves feel further.Five lines should be replaced.
Complete kits are available from Galfer (part number FK003D184) and Wunderlich.
- Front brake hydraulic cylinder down to the metal bike line.
- ABS return line to the Y fitting near the front lower fender.
- From the Y connection near the front lower fender down to the front brake calipers (left).
- From the Y connection near the front lower fender down to the front brake calipers (right).
- Rear ABS return line back to the rear caliper.
(There have been some false stories that somehow BMW's ABS II does not work properly with stainless brake lines. This is completely untrue. The Wunderlich kit has full certification from the TuV, the very strict German approval authorities.)

|
A company called MOBEC in Germany specialize in sidecar conversions for BMW motorcycles. Naturally they have one for the R11GS! Click the small image on the left to see two of their many options. | |
MOBEC modify the suspension and brakes and fit different tires. They also offer a two wheel drive option, Duodrive. MOBEC build to a high standard and have a range of sidecars available in different shapes, sizes and colors.For further information contact:
MOBEC
Stuttgarter Str 139
73066 Uhingen
Germany
Tel: +49 (0) 71 61 3 21 41
Fax: +49 (0) 71 61 3 80 81Another German company that makes sidecars is Armec . They offer a range of sidecars including the Sidewinder free-leaning model and have an office for North America. They have a picture of a red R11GS with sidecar attached.
| Back to the: |
|
|
Go to MicaPeak home page. For contact and questions : Hari Ahluwalia (eurhia@eur.sas.com) or jmoxhet@netscape.net Updated the 03 January 2001 |


